Endotracheal Intubation: Safeguarding Airway in the Operation Theater
ETT Size Guide:
- Adults:
- Most commonly used sizes in adults are between 7 & 8mm
- Sizes may vary according to the anatomical variations or abnormailities.
- Paediatrics:
- There is a formula to calculate the size of ETT in paediatric patients.
- ETT Size = [Age / 4 ] + 4
Intubation Checklist
| Step | 1st attempt | 2nd attempt |
|---|---|---|
| Pre-procedure | ||
| Assessment of patient and airway | ||
| Ensures trained assistant & senior supervision | ||
| Confirms airway plan with anaesthetic assistant | ||
| Performs WHO sign in | ||
| Full monitoring including capnography | ||
| Ensures patent IV cannula | ||
| Optimises patient position | ||
| Pre-oxygenation until ETO2 > 0.8 | ||
| Procedure | ||
| Supports airway using simple manoeuvres | ||
| Supports ventilation using bag mask ventilation | ||
| Assesses adequacy of anaesthesia/relaxation | ||
| Inserts laryngoscope correctly into mouth and obtains view – vocalises view | ||
| Inserts endotracheal tube to correct distance | ||
| Uses additional manoeuvres or adjuncts, if required (e.g. external neck pressure; bougie) | ||
| Anchors ETT to ensure it does not move | ||
| Removes laryngoscope carefully from mouth | ||
| Attaches ventilator tubing to ETT | ||
| Confirms ventilation – chest rising, ETCO2, auscultates chest | ||
| Secures ETT | ||
| Post-procedure | ||
| Documentation of airway management | ||
| Throughout | ||
| Appropriate communication with assistant & patient | ||
| Aware of patient condition/vital signs | ||
| Shows understanding of adequate anaesthetic/paralysis for intubation/maintenance |
Endotracheal Intubation: Video
ETT Video
ETT Tips & Tricks
Endotracheal intubation is a critical procedure performed in the operation theater for anesthesia to secure a patient's airway during surgical procedures. It involves the insertion of an endotracheal tube through the patient's mouth or nose into the trachea, allowing for controlled ventilation and anesthesia delivery. This procedure is essential for maintaining adequate oxygenation, ventilation, and airway protection during surgery. Here is a step-by-step guide outlining the key aspects of the endotracheal intubation procedure.
- Procedure for Endotracheal Intubation in the Operation Theater for Anesthesia:
- Preparation:
- Gather necessary equipment: endotracheal tube, laryngoscope, stylet, syringe, bag-valve mask, oral airway, end-tidal carbon dioxide (EtCO2) monitor, and suction.
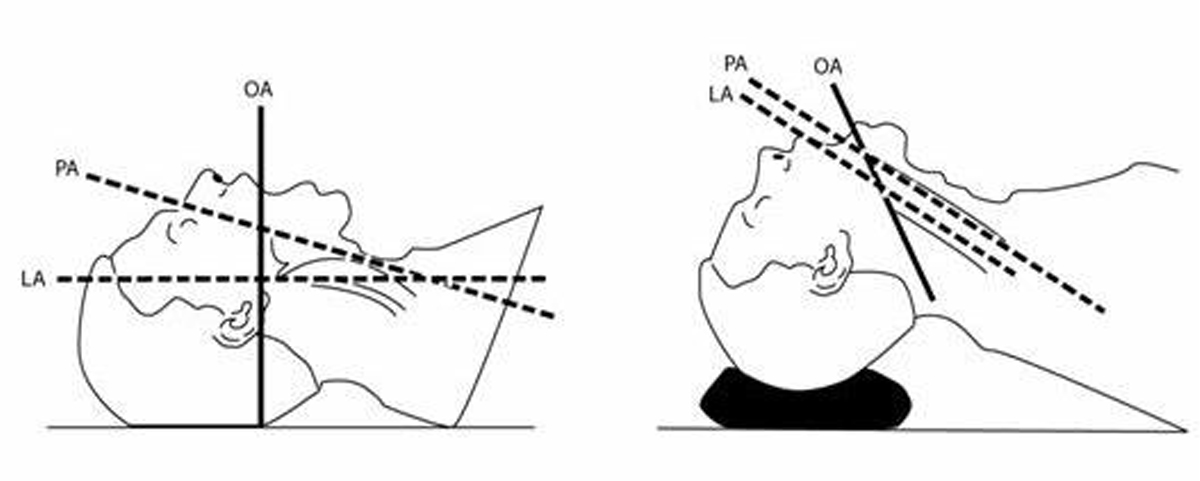
- Position the patient on the operating table with proper padding and alignment.
- Ensure adequate lighting and visualization of the patient's airway.
- Perform a preoperative assessment of the patient's airway.
- Sterile Field Setup:
- Put on sterile gloves and prepare a sterile field using sterile drapes.
- Ensure the sterile field covers the patient's mouth, nose, and surrounding area.
- Induction of Anesthesia:
- Administer appropriate intravenous induction agents and muscle relaxants as per the anesthetic plan.
- Maintain oxygenation and ventilation using a bag-valve mask or other suitable methods.
- Laryngoscope Insertion and Visualization:
- Insert the blade:
- Hold the laryngoscope in the left hand (or non-dominant hand)
- Insert the blade of the laryngoscope into the right side of the fully open mouth
- Pass the blade to the right of the tongue
- Avoid contact with the soft tissues and teeth.
- Advance the blade:
- Advance the blade down the right side of the tongue
- “Sweep” the tongue to the left and out of the way
- Continue to advance the blade towards the base of the tongue
- Return the tip of the blade to the midline, identifying the epiglottis, prior to placing the tip into the vallecula.
- Lift the epiglottis:
- Use a moderate lifting force applied along the line of the laryngoscope handle (at a 45-degree angle to the floor) to lift the epiglottis and reveal the glottis
- Do not lever backwards on to the top teeth
- while doing this it is essential to maintain mouth opening and head and neck position.
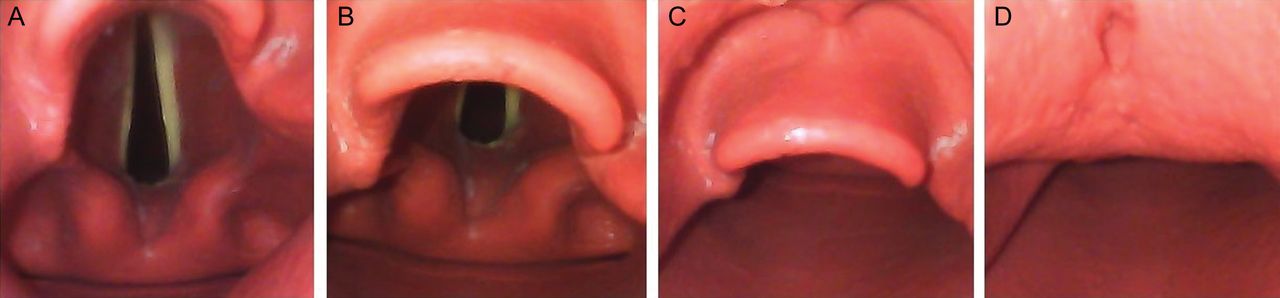
- Reveal the vocal cords:
- The larynx should now be visible
- Achieve the best view:
- Once the best view has been achieved, the anaesthetist should not take their eye off the vocal cords.
- Endotracheal Tube Insertion:
- Identify the appropriate time to perform the intubation based on the patient's clinical condition and assessment. Insert tube only if cords are visulized or ask for senior help.
- Maintain a view of the vocal cords while your assistant hands you the ETT
- Hold the ETT towards the proximal end
- Pass the ETT from the right side of the mouth, so that it can be seen approaching and entering the glottis in a direct line of sight (see image below)
- Advance the ETT until the cuff is about 2 cm distal to the vocal cords (many ETTs have a black mark, indicating the depth at the cords)
- Once positioned, take great care that the tube does not move. This is best done by holding the tube with your hand anchored on the patient’s cheek until the tube is secured.
- Inflating the Cuff and Confirmation:
- Your assistant will inflate the cuff to obtain a seal and prevent air leak from the lungs.
- your assistant will check the cuff pressure is within the normal range using a manometer.
- Confirmation:
- Visualise tube position through cords.
- Bilateral chest movement when squeezing the bag (visual +/– auscultation)
- You should see misting of the ETT
- ETCO2 capnography trace must be present – THIS IS CRUCIAL
- Once confirmed, secure the ETT with cotton bandage or paper-tape, whatever is avaialble.
- Complications and Troubleshooting:
- Be prepared to manage potential complications such as hypoxia, hypotension, laryngospasm, or tube misplacement.


Effective troubleshooting during endotracheal tube intubation is crucial for ensuring successful airway management. By following key strategies such as optimizing patient position, utilizing external laryngeal manipulation, and addressing oesophageal or endobronchial intubation promptly, anaesthetists can overcome common challenges and enhance patient safety. Clear communication of encountered difficulties on the anaesthetic chart enables seamless continuity of care and empowers future anaesthetists to provide optimal airway management. Remember, thorough troubleshooting contributes to improved outcomes and enhances the overall success of the intubation procedure.
a project of alostmedic.com