Basic Airway Management:The Path to Lifesaving Breaths
Bag-mask ventilation is a fundamental skill in basic airway management but can be challenging to master. It is primarily performed in cases of inadequate ventilation, which may result from impaired respiratory effort or airway obstruction. Basic airway interventions are also necessary for managing patients with inadequate oxygenation and during cardiopulmonary resuscitation (CPR).
- Causes of Inadequate Ventilation:
- Respiratory effort:Inadequate respiratory effort can result from intrinsic (e.g., intracranial hemorrhage) or extrinsic (e.g., opioid overdose) factors. Assessing respiratory effort can be challenging as it is often silent and requires careful observation of chest wall movement, breathing pattern, use of accessory muscles, abnormal sounds, and signs of injury.
- Airway obstruction:Unconscious patients can experience airway obstruction due to soft tissue prolapse into the posterior pharynx, loss of muscular tone in the soft palate, or the presence of foreign bodies, injured tissue, blood, or secretions. Noises such as snoring or gurgling may indicate partial obstruction, while complete airway obstruction can manifest as retractions of accessory muscles or cyanosis. Prompt identification and relief of airway obstruction are crucial.
- Airway Maneuvers:
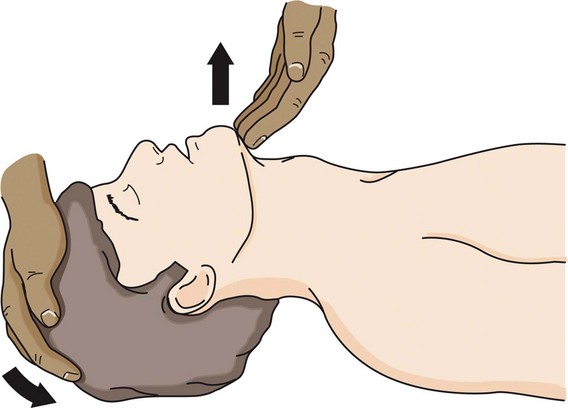
- Head-tilt chin-lift:This maneuver is the primary technique for patients without suspected cervical spine injury. It involves using two hands to extend the patient's neck and open the airway. One hand applies downward pressure on the forehead, while the index and middle fingers of the other hand lift the mandible at the mentum to elevate the tongue from the posterior pharynx.
- Jaw-thrust maneuver:The jaw-thrust maneuver is suitable for patients with suspected cervical spine injury. It moves the tongue anteriorly with the mandible, reducing the likelihood of airway obstruction. To perform this maneuver, stand at the head of the bed while the patient is supine, place the heels of both hands on the parieto-occipital areas of the patient's head, and grasp the angles of the mandible with the index and long fingers. Then, displace the jaw anteriorly.
- Cervical Spine Immobilization:
- Mallampati Classification:The Mallampati classification is a widely used method to assess the visibility and size of the oral cavity and pharynx. It involves asking the patient to open their mouth and protrude their tongue while the examiner is at level the same levels as that of patient and evaluates the structures. The classification ranges from I to IV.
- Class I (PUSH): The entire tonsillar pillars, uvula, hard and soft palates are visualized
- Class II (USH): Partial uvula and soft palate are visualized
- Class III (SH): Only the soft palate is visualized
- Class IV (H): Only hard palate is visualized or no visualization of any structures beyond the tongue
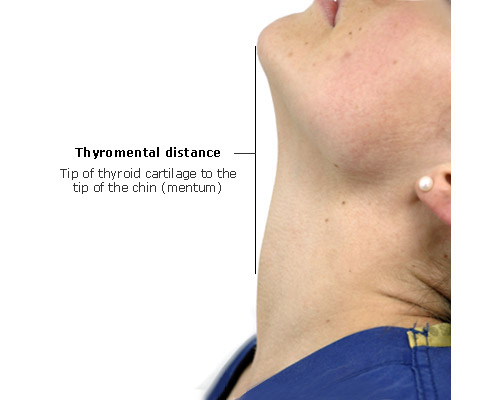
- Thyromental Distance:The thyromental distance is measured as the distance between the thyroid notch and the tip of the chin with the patient's head fully extended. Short TMD has been defined as less than 6 cm. A shorter thyromental distance may suggest limited space for airway management and potential difficulty in achieving proper alignment during intubation. It is the single most important indicator of a difficult intubation.
- Sternomental distanceSternomental distance is measured between the sternal notch and the mandible, measured in full neck extension. Short sternomental distance is defined as less than 12 cm. This parameter and TMD may be objective surrogates for adequacy of neck extension.
- Mandibular protrusion (Upper lip bite test):Patients are asked to protrude the lower jaw such that the mandibular teeth are in front of the maxillary teeth, as a predictor of the ability to sublux the mandible during laryngoscopy. A more objective, similar measurement is the upper lip bite test (ULBT), which assesses the patient's ability to reach and cover the upper lip with their lower incisors. ULBT grading includes
- Grade 1: The patient can fully cover the upper lip with lower incisors
- Grade 2: The patient can partially cover the upper lip with lower incisors
- Grade 3: The patient cannot reach the upper lip with lower teeth
- Interincisor Gap:The interincisor gap is assessed by measuring the distance between the upper and lower incisors when the patient opens their mouth. A reduced interincisor gap may indicate limited mouth opening and potential challenges during intubation or mask ventilation. A crude method (three finger test) is to check whether patient can fit 3 fingers in his mouth in vertical orientation.
- Neck Mobility:Evaluation of neck mobility is crucial as restricted movement can impact airway positioning and intubation. Assessing the ability to flex, extend, and rotate the neck helps identify potential difficulties in achieving optimal airway alignment.
- Radiological Imaging:In some cases, e.g. retrosternal extension of thyroid, radiological imaging such as X-rays, computed tomography (CT), or magnetic resonance imaging (MRI) may be utilized to assess the airway anatomy in greater detail. These imaging techniques can help identify structural abnormalities, tumors, or other factors that may impede airway management.
- Ultrasound:Ultrasound can be employed to assess the airway in real-time. It allows visualization of the soft tissues, structures, and dynamic movements during respiration. Ultrasound can assist in identifying anatomical variations, determining the optimal site for airway interventions, and guiding the placement of devices such as supraglottic airway devices or percutaneous tracheostomy.
- Endoscopic Evaluation:In certain cases, a flexible or rigid endoscope may be used to directly visualize the airway and assess its anatomy. This technique provides a detailed view of the larynx, vocal cords, and any potential abnormalities that may affect airway management.
- Airway Adjuncts:
- Oropharyngeal airway (OPA):OPAs are only suitable for deeply unresponsive patients who cannot maintain their airway. Using an OPA in responsive patients can lead to vomiting and aspiration. OPAs are curved, firm, hollow tubes with a rectangular opening. They are used to create a clear path between the mouth and glottis, preventing obstruction by the tongue and other soft tissues. When inserting an OPA, ensure the flange rests against the patient's lips to prevent accidental inward movement. OPAs are available in different sizes, and a rough method for selecting the correct size is to align the airway with the patient's mandible, with the tip reaching the angle of the mandible.
- Nasopharyngeal airway (NPA):NPAs are soft rubber or plastic tubes inserted through the nose into the posterior pharynx. Patients tolerate NPAs better than OPAs, making them suitable when using an OPA is challenging, such as in patients with a clenched jaw or those who are semiconscious. NPAs, also known as nasal trumpets, are sized based on their internal diameter. The longer the tube, the larger the internal diameter. To choose the correct size, align the airway with the patient's mandible, with the flared end at the tip of the nose and the distal tip reaching the angle of the mandible. Before insertion, coat the NPA with water-soluble lubricant or anesthetic jelly. Insert the tube along the floor of the naris into the posterior pharynx, noting the caudad inclination of the naris floor. Rotate the tube if resistance is encountered.
- Bag-mask Venilation:
- Successful bag-mask ventilation relies on three key factors:
- Clear airway
- Proper mask seal
- Correct ventilation (including volume, rate, and cadence)
- Two techniques can be used to hold the mask in place:
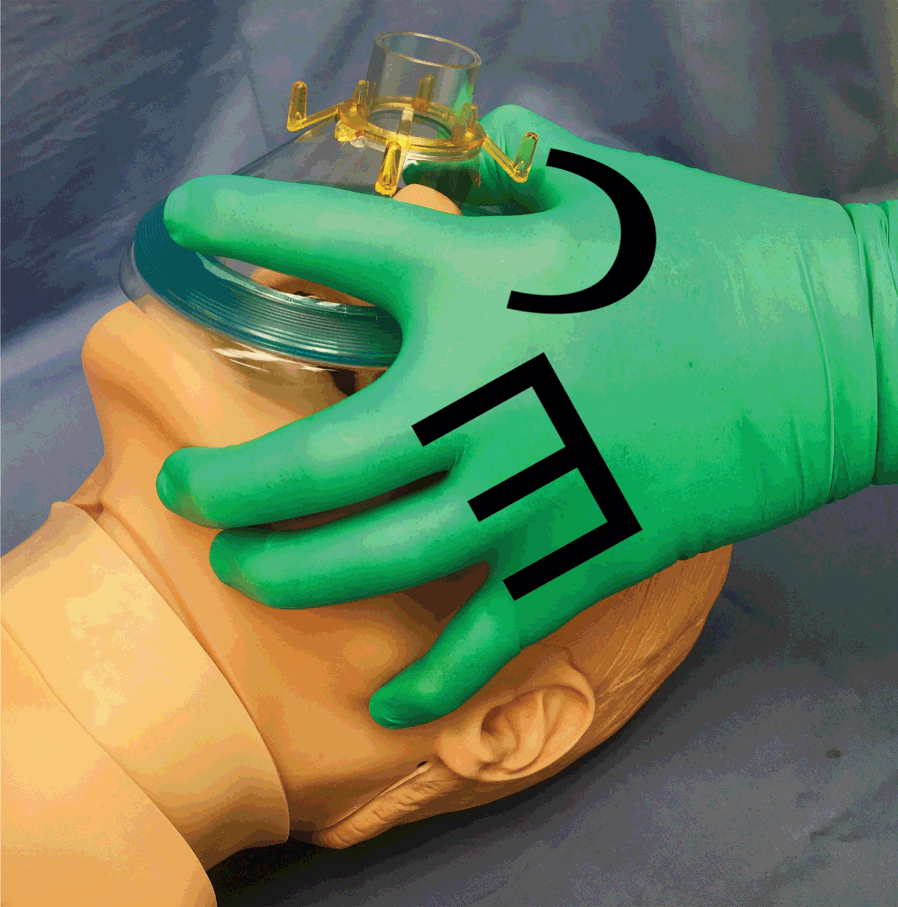
- Single-hand technique
- Placement of one hand on the mask, with the web space between the thumb and index finger resting against the mask connector (Like the C-shape).
- The other three fingers are used to perform a chin-lift maneuver, lifting the mandible into the mask (Like the E-shape).
- Two-hand technique.
- One maintaining a good mask seal and open airway
- The other squeezes the bag to ventilate the patient
- Ventilation volumes, rates, and cadence:
- Giving excessive tidal volumes
- Forcing air too quickly
- Ventilating too rapidly
- Cricoid pressure (Sellicks maneuver):


In conclusion, inadequate ventilation can occur due to insufficient respiratory effort or airway obstruction. Proper assessment and management of the airway are crucial to ensure adequate oxygenation and ventilation. Airway maneuvers, adjuncts, and careful monitoring play a vital role in maintaining an open airway during bag-mask ventilation. It is important to avoid excessive tidal volumes, rapid ventilation, and forcing air too quickly to prevent complications such as barotrauma and gastric insufflation. Additionally, the use of appropriate techniques, such as cricoid pressure, remains a topic of debate in airway management. Overall, a comprehensive understanding of airway anatomy, proper technique, and vigilance are essential for successful bag-mask ventilation and optimal patient outcomes.
a project of alostmedic.com